> ## Documentation Index
> Fetch the complete documentation index at: https://docs.nexusbotix.io/llms.txt
> Use this file to discover all available pages before exploring further.
# Creating, editing and duplicating bots
**Customize Chatbot**
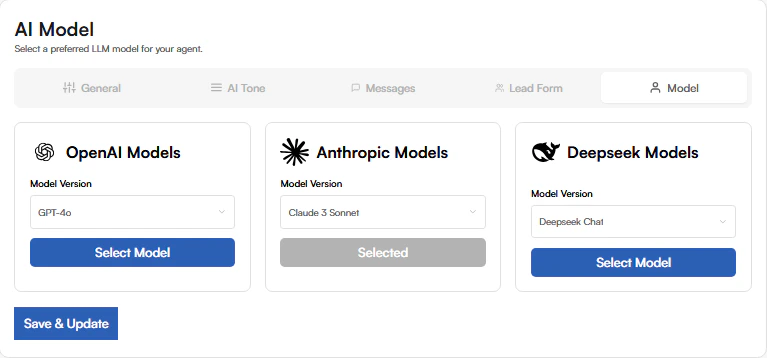
The Customize Chatbot page allows you to define the personality, appearance, and behavior of your Nexus Botix AI Agent. From here, you can control how your chatbot looks, sounds, and interacts with users across all connected channels.
**General Settings**
The General tab controls the default visual identity and display information for your chatbot.
**Display Name**
* Sets the name shown on the chatbot widget.
* This name appears at the top of the chat interface when users interact with your bot.
* Example: John Doe, Customer Support, Sales Assistant
**Best Practice:** Use a friendly and professional name that reflects the bot’s role.
**Profile Avatar**
* Upload a custom avatar or logo for your chatbot.
* Supported formats typically include PNG and JPG.
* The avatar appears beside chatbot messages.
**Tip:** Use your brand logo or a human-style icon to increase trust and engagement.
**Colors**
Customize the chatbot’s visual appearance to match your brand identity.
**Chatbot Background Color**
* Choose between Light Mode or other available themes.
* Affects the overall background of the chat interface.
**Message Background Color**
* Select the background color for chatbot messages.
* Use the color picker to choose from preset colors or define a custom brand color.
\*\*Tip: \*\* Ensure good contrast between text and background for readability.
**Live Preview Panel**
On the right side of the page, you will see a real-time preview of your chatbot.
The preview shows:
* Chatbot name and avatar
* Sample greeting message
* User messages and chatbot replies
* Message input field and send button
Any change you make (**name, colors, avatar**) is instantly reflected in the preview so you can see exactly how your chatbot will appear to users.
**Saving Your Changes**
All changes made on this page are applied to your chatbot across all connected channels, including:
* Website chat widget
* WhatsApp
* Facebook Messenger
Make sure to review the live preview before deploying your chatbot.\\
 \
**AI Tone**
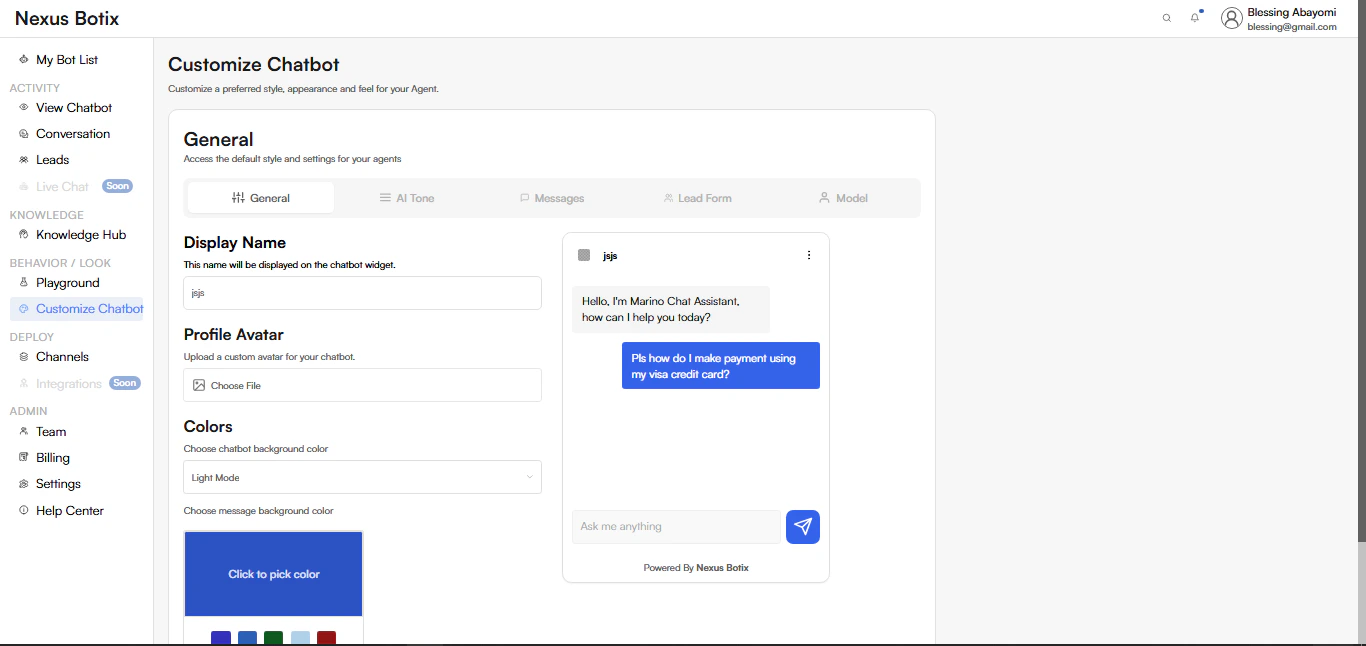
The AI Tone section allows you to fine-tune how your chatbot behaves and communicates with users. Here, you define the chatbot’s purpose, response style, and core behavioral instructions that guide every interaction.
**Page Overview**
The AI Tone page is divided into two main sections:
* Chatbot Category & Response Style (left panel)
* Prompt Configuration (right panel)
These settings collectively control your chatbot’s tone, personality, and role.
**Chatbot Category**
**Field:** *Chatbot Category*
**Description:** Select the category that best describes your chatbot’s purpose.
**Example Selection**
* General Customer Services
* Technical Support
* Sales
* Marketing
* Human Resources
This helps the AI understand the context in which it should operate, such as handling customer inquiries, support requests, and general questions.
**Tip:** Always select the category that most closely matches your chatbot’s real-world function.
**Response Style**
**Field:** *Response Style*
**Description:** Choose the tone and communication style of your chatbot’s responses.
**Available Options**
* **Friendly** – Warm, conversational, and engaging
* **Neutral:** Balanced, clear, and informative (selected by default)
* \*\*Professional: \*\*Formal, concise, and business-focused
The selected response style influences the wording, level of formality, and overall feel of chatbot replies.
**Prompt**
**Field:** *Prompt*
**Description:** Explain how you want the chatbot to behave. This text is used as part of the prompt sent to the AI model.
**Example Prompt Shown**
* You are a customer service chatbot called John Doe, you are designed to assist with inquiries related to our products and services. Help customers with orders, returns, FAQs, and general questions.
**Tone:** Maintain a balanced, clear, and helpful tone. Be informative without being overly casual or formal.
**What the Prompt Controls**
* Chatbot identity and role
* Scope of assistance (e.g., orders, returns, FAQs)
* Tone and communication boundaries
* Overall behavior during conversations
**Best Practice:** Write prompts that are clear, specific, and aligned with your selected Response Style.
**Save & Update**
Click Save & Update to apply your changes.
Once saved:
* The new AI tone takes effect immediately
* All future chatbot conversations follow these instructions
* Changes apply across all connected platforms (Website, WhatsApp, Messenger)
\
**AI Tone**
The AI Tone section allows you to fine-tune how your chatbot behaves and communicates with users. Here, you define the chatbot’s purpose, response style, and core behavioral instructions that guide every interaction.
**Page Overview**
The AI Tone page is divided into two main sections:
* Chatbot Category & Response Style (left panel)
* Prompt Configuration (right panel)
These settings collectively control your chatbot’s tone, personality, and role.
**Chatbot Category**
**Field:** *Chatbot Category*
**Description:** Select the category that best describes your chatbot’s purpose.
**Example Selection**
* General Customer Services
* Technical Support
* Sales
* Marketing
* Human Resources
This helps the AI understand the context in which it should operate, such as handling customer inquiries, support requests, and general questions.
**Tip:** Always select the category that most closely matches your chatbot’s real-world function.
**Response Style**
**Field:** *Response Style*
**Description:** Choose the tone and communication style of your chatbot’s responses.
**Available Options**
* **Friendly** – Warm, conversational, and engaging
* **Neutral:** Balanced, clear, and informative (selected by default)
* \*\*Professional: \*\*Formal, concise, and business-focused
The selected response style influences the wording, level of formality, and overall feel of chatbot replies.
**Prompt**
**Field:** *Prompt*
**Description:** Explain how you want the chatbot to behave. This text is used as part of the prompt sent to the AI model.
**Example Prompt Shown**
* You are a customer service chatbot called John Doe, you are designed to assist with inquiries related to our products and services. Help customers with orders, returns, FAQs, and general questions.
**Tone:** Maintain a balanced, clear, and helpful tone. Be informative without being overly casual or formal.
**What the Prompt Controls**
* Chatbot identity and role
* Scope of assistance (e.g., orders, returns, FAQs)
* Tone and communication boundaries
* Overall behavior during conversations
**Best Practice:** Write prompts that are clear, specific, and aligned with your selected Response Style.
**Save & Update**
Click Save & Update to apply your changes.
Once saved:
* The new AI tone takes effect immediately
* All future chatbot conversations follow these instructions
* Changes apply across all connected platforms (Website, WhatsApp, Messenger)
 **Messages**
The Messages section allows you to customize the default messages and text prompts users see when interacting with your chatbot. These messages help guide users and set the tone at the start of every conversation.
**Page Overview**
The Messages page is divided into two areas:
* Message Configuration (left panel)
* Live Chat Preview (right panel)
Any changes you make are instantly reflected in the preview.
**Placeholder Message**
**Field:** *Placeholder Message*
**Description:** This message appears inside the chat input field before the user starts typing.
**Use Cases**
* Encourage user engagement
* Suggest what users can ask
* Provide subtle guidance
**Best Practice:** Keep this short and inviting, such as “Ask a question…” or “Type your message here…”.
**Welcome Message**
\*\*Field: \*\**Welcome Message*
\*\*Description: \*\*This message is automatically displayed when a new chat session begins.
**Use Cases**
* Introduce the chatbot
* Set expectations for assistance
* Create a friendly first impression
**Best Practice:** Clearly state who the chatbot is and how it can help.
**Live Chat Preview**
The preview panel shows how your chatbot will look and behave in real time, including:
* Chatbot name and avatar
* Welcome message
* User messages
* Input field with placeholder text
* Send button
This helps you confirm that your messages appear exactly as intended before saving.
**Save & Update**
Click Save & Update to apply your message changes.
Once saved:
* The updated messages are applied immediately
* Changes affect all active chatbot channels
* New conversations will display the updated messages
**Messages**
The Messages section allows you to customize the default messages and text prompts users see when interacting with your chatbot. These messages help guide users and set the tone at the start of every conversation.
**Page Overview**
The Messages page is divided into two areas:
* Message Configuration (left panel)
* Live Chat Preview (right panel)
Any changes you make are instantly reflected in the preview.
**Placeholder Message**
**Field:** *Placeholder Message*
**Description:** This message appears inside the chat input field before the user starts typing.
**Use Cases**
* Encourage user engagement
* Suggest what users can ask
* Provide subtle guidance
**Best Practice:** Keep this short and inviting, such as “Ask a question…” or “Type your message here…”.
**Welcome Message**
\*\*Field: \*\**Welcome Message*
\*\*Description: \*\*This message is automatically displayed when a new chat session begins.
**Use Cases**
* Introduce the chatbot
* Set expectations for assistance
* Create a friendly first impression
**Best Practice:** Clearly state who the chatbot is and how it can help.
**Live Chat Preview**
The preview panel shows how your chatbot will look and behave in real time, including:
* Chatbot name and avatar
* Welcome message
* User messages
* Input field with placeholder text
* Send button
This helps you confirm that your messages appear exactly as intended before saving.
**Save & Update**
Click Save & Update to apply your message changes.
Once saved:
* The updated messages are applied immediately
* Changes affect all active chatbot channels
* New conversations will display the updated messages
 **Lead Form**
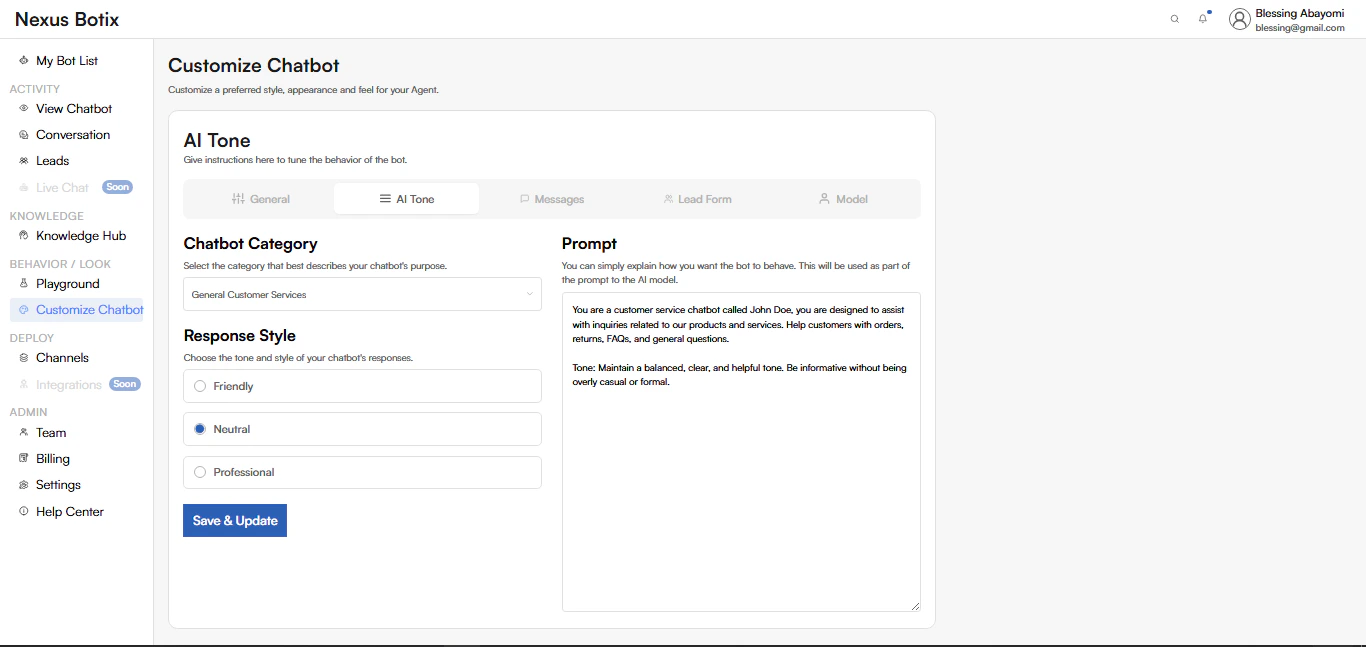
The Lead Form section allows you to customize how your chatbot collects user contact details during conversations. This form appears inside the chat widget when follow-up is required and helps convert conversations into qualified leads.
**Page Overview**
The Lead Form page is divided into two areas:
* Form Configuration (left panel)
* Live Chat Preview (right panel)
Any changes you make are instantly reflected in the preview.
**Description Message**
**Field:** *Description Message*
**Description:** This message appears above the lead form in the chat widget. It explains why the user is being asked to provide their details.
**Example Shown**
Please provide your details below, and we’ll get back to you shortly.
**Use Cases**
* Explain next steps to the user
* Reassure users about follow-up
* Increase form completion rates
**Best Practice:** Keep this message short, clear, and reassuring.
**Name Placeholder**
**Field:** Name Placeholder
**Description:** Sets the placeholder text for the name input field.
**Example Shown**
Full Name
**Best Practice:** Use clear, standard wording users instantly understand.
**Email Placeholder**
**Field:** *Email Placeholder*
**Description:** Sets the placeholder text for the email address input field.
**Example Shown**
Email Address
**Best Practice:** Avoid variations that may confuse users; keep it simple and familiar.
**Telephone Placeholder**
**Field:** Telephone Placeholder
**Description:** Sets the placeholder text for the phone number input field.
**Example Shown**
Phone Number
**Use Cases**
* Request call-back details
* Enable direct follow-up
* Support sales or customer service workflows
**Button Text**
**Field:** *Button Text*
**Description:** Customizes the label on the form submission button.
**Example Shown**
Submit
**Alternative Examples**
* Send
* Contact Me
* Request Callback
**Best Practice:** Match the button text to your business goal and user intent.
**Live Chat Preview**
The preview panel shows how the lead form appears inside the chatbot, including:
* Sample conversation flow
* Assistant message prompting the form
* Lead form fields (Name, Email, Phone)
* Submit button
* Chat input area
This ensures the form looks and reads exactly as intended before saving.
**Save & Update**
Click Save & Update to apply your changes.
Once saved:
* Updates apply immediately
* All agents using the default lead form are affected
* New conversations will display the updated form
**Lead Form**
The Lead Form section allows you to customize how your chatbot collects user contact details during conversations. This form appears inside the chat widget when follow-up is required and helps convert conversations into qualified leads.
**Page Overview**
The Lead Form page is divided into two areas:
* Form Configuration (left panel)
* Live Chat Preview (right panel)
Any changes you make are instantly reflected in the preview.
**Description Message**
**Field:** *Description Message*
**Description:** This message appears above the lead form in the chat widget. It explains why the user is being asked to provide their details.
**Example Shown**
Please provide your details below, and we’ll get back to you shortly.
**Use Cases**
* Explain next steps to the user
* Reassure users about follow-up
* Increase form completion rates
**Best Practice:** Keep this message short, clear, and reassuring.
**Name Placeholder**
**Field:** Name Placeholder
**Description:** Sets the placeholder text for the name input field.
**Example Shown**
Full Name
**Best Practice:** Use clear, standard wording users instantly understand.
**Email Placeholder**
**Field:** *Email Placeholder*
**Description:** Sets the placeholder text for the email address input field.
**Example Shown**
Email Address
**Best Practice:** Avoid variations that may confuse users; keep it simple and familiar.
**Telephone Placeholder**
**Field:** Telephone Placeholder
**Description:** Sets the placeholder text for the phone number input field.
**Example Shown**
Phone Number
**Use Cases**
* Request call-back details
* Enable direct follow-up
* Support sales or customer service workflows
**Button Text**
**Field:** *Button Text*
**Description:** Customizes the label on the form submission button.
**Example Shown**
Submit
**Alternative Examples**
* Send
* Contact Me
* Request Callback
**Best Practice:** Match the button text to your business goal and user intent.
**Live Chat Preview**
The preview panel shows how the lead form appears inside the chatbot, including:
* Sample conversation flow
* Assistant message prompting the form
* Lead form fields (Name, Email, Phone)
* Submit button
* Chat input area
This ensures the form looks and reads exactly as intended before saving.
**Save & Update**
Click Save & Update to apply your changes.
Once saved:
* Updates apply immediately
* All agents using the default lead form are affected
* New conversations will display the updated form
 **AI Model**
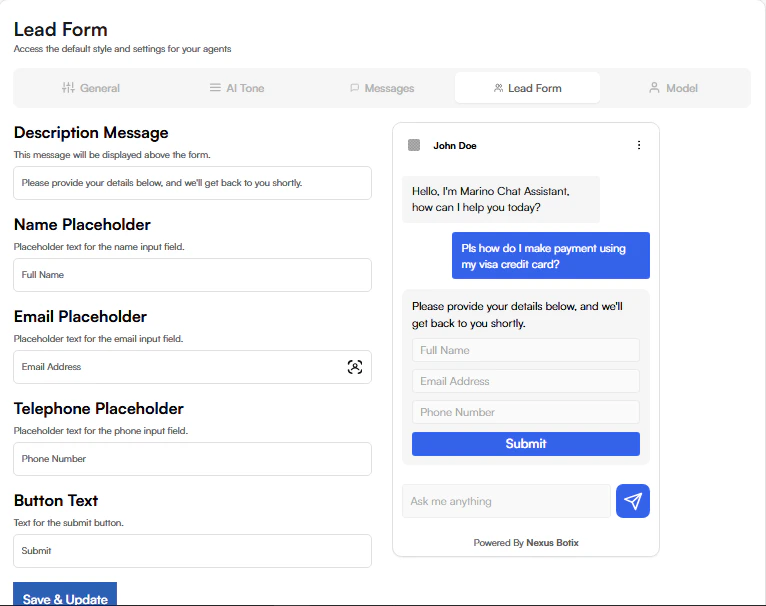
The AI Model section allows you to select the large language model (LLM) that powers your chatbot’s responses. Choosing the right model helps balance intelligence, tone, speed, and cost for your specific use case.
**Page Overview**
The AI Model page is organized into selectable model providers:
* OpenAI Models
* Anthropic Models
* DeepSeek Models
Only one model can be active at a time.
**OpenAI Models**
**Section:** OpenAI Models
**Description:** Select an OpenAI-powered model for your chatbot.
**Field:** Model Version
**Example Shown:** GPT‑4o
**Use Cases**
* General-purpose conversations
* High-quality reasoning and responses
* Balanced performance across tasks
**Anthropic Models**
**Section:** Anthropic Models
**Description:** Select an Anthropic-powered model focused on safe and helpful conversations.
**Field:** Model Version
**Example Shown:** Claude 3 Sonnet
**Use Cases**
* Long-form responses
* Clear, structured explanations
* Customer support and knowledge-based chats
**DeepSeek Models**
**Section:** DeepSeek Models
\*\*Description: \*\*Select a DeepSeek-powered model optimized for efficient conversational performance.
**Field:** Model Version
**Example Shown:** Deepseek Chat
**Use Cases**
* Fast conversational responses
* Cost-efficient deployments
* Lightweight chatbot use cases
**Model Selection Behavior**
* Only one model can be selected at a time
* The currently active model is marked as Selected
* Switching models updates your chatbot’s intelligence and response style
**Save & Update**
Click Save & Update to apply your selected model.
Once saved:
* The new model becomes active immediately
* All chatbot responses use the selected model
* Existing and new conversations are affected
**AI Model**
The AI Model section allows you to select the large language model (LLM) that powers your chatbot’s responses. Choosing the right model helps balance intelligence, tone, speed, and cost for your specific use case.
**Page Overview**
The AI Model page is organized into selectable model providers:
* OpenAI Models
* Anthropic Models
* DeepSeek Models
Only one model can be active at a time.
**OpenAI Models**
**Section:** OpenAI Models
**Description:** Select an OpenAI-powered model for your chatbot.
**Field:** Model Version
**Example Shown:** GPT‑4o
**Use Cases**
* General-purpose conversations
* High-quality reasoning and responses
* Balanced performance across tasks
**Anthropic Models**
**Section:** Anthropic Models
**Description:** Select an Anthropic-powered model focused on safe and helpful conversations.
**Field:** Model Version
**Example Shown:** Claude 3 Sonnet
**Use Cases**
* Long-form responses
* Clear, structured explanations
* Customer support and knowledge-based chats
**DeepSeek Models**
**Section:** DeepSeek Models
\*\*Description: \*\*Select a DeepSeek-powered model optimized for efficient conversational performance.
**Field:** Model Version
**Example Shown:** Deepseek Chat
**Use Cases**
* Fast conversational responses
* Cost-efficient deployments
* Lightweight chatbot use cases
**Model Selection Behavior**
* Only one model can be selected at a time
* The currently active model is marked as Selected
* Switching models updates your chatbot’s intelligence and response style
**Save & Update**
Click Save & Update to apply your selected model.
Once saved:
* The new model becomes active immediately
* All chatbot responses use the selected model
* Existing and new conversations are affected